• Асинхронное выполнение сценариев

    Перенесена Статьи и видео ce .ct ce aa ce async фишки
    1
    5
    0 Голоса
    1 Сообщения
    77 Просмотры
    MasterGHM
    Записи в таблице CE представим как сценарии, которые должны выполнятся асинхронно. Т.е. они что-от делают некоторое время одновременно, например, сканируют память. При этом ничего зависает. Для этого будем актировать такую опцию Если эту опцию поставить на записи, то появляются вот такие часики АА-шные скрипты могут искать в этот момент сигнатуру. Lua скрипты потестить было интересно, узнать действительно ли асинхронно выполняется. Например, один скрипт выполняет счет, второй выполняет счет. По выполнении выводится результат. [ENABLE] {$lua} local _, counter, _, async = memrec.Description:match('(Cunt.=.)(%d*).*(Async.=.)(%w*)') memrec.Async = async == 'true' for i = 1, counter do end local currentTime = os.date("%c"):gsub('/','.') print('Finish record:' .. memrec.Description..', at time ' .. currentTime) memrec.Active = false function onMemRecPostExecute(memoryrecord, newState, succeeded) if (memoryrecord == memrec and newState == true) then memrec.Active = false end end {$asm} [DISABLE] После выполнения Если продублировать 4 скрипта, то видим, что нельзя запустить асинхронно более двух скриптов Вот такой вариант еще [ENABLE] {$Lua} function threadFunction(th) th.freeOnTerminate(false) th.Name = 'myThread' for b = 1, 200000000 do --checkSynchronize() end --while not th.Terminated do -- myvar=myvar+1 -- synchronize(function() MainForm.Caption = 'myvar '..myvar end) -- sleep(2000) --end synchronize(function() print("1") end) end --myvar=0 local myThread = createNativeThreadSuspended(threadFunction) myThread.resume() {$Asm} [DISABLE] {$Lua} if myThread then myThread.terminate() myThread.waitfor() myThread.destroy() myThread=nil end {$Asm} таблица Asynchronous testing.CT
  • Рубрика "Lua код сегодня" №2

    Перенесена Статьи и видео ce lua обучалка
    1
    2
    0 Голоса
    1 Сообщения
    80 Просмотры
    MasterGHM
    local address = 0x0170A490 local x, y, z = 0, 100, 100 writeDouble(address, x) writeDouble(address + 8, y) writeDouble(address + 16, z) Данный код позволяет записать значение координат и переместить персонажа. Обычно, адреса координат идут последовательно x,y,z и имеют тип float или double. Чтобы переместить персонажа нужно узнать его адрес координат и выполнить код в Lua консоли И убедиться, что данные записались в память процесса Далее мы с вами будем очень много программировать короткими примерами в консоли управляя данными процесса и в том числе связывать это с базами данных. Например, такой-то пользователь, для такого-то персонажа создал таблицу телепортации с локациями и координатами. Этой таблицей можно будет очень удобно пользоваться. Также вы изучите принцип программирования, который используется при работе с СУБД.
  • Сделать большой брейкпоинт на структуру через dbk_useKernelmodeOpenProcess

    Перенесена Статьи и видео фишки breakpoint ce lua dbk
    3
    4
    0 Голоса
    3 Сообщения
    201 Просмотры
    MasterGHM
    Пользователь @Pitronic написал в Сделать большой брейкпоинт на структуру через dbk_useKernelmodeOpenProcess: Мы знаем что адрес таймера на выстрел во первых лежит в одной структуре с патронами, во вторых адрес в начале меняется в момент выстрела одновременно с уменьшением патронов и в пределах от одной до 100 миллисекунд возвращается в прежнее значение. может lua скрипт специальный можно сделать? Я бы сделал без скриптов. делаешь dessect structure Далее как обычно. Создаешь структуру. Затем вот это (следить за изменениями) ну а дальше воспроизводишь свой выстрел потом создаешь структуру из изменившихся данных (потому что их будешь очень много наверняка) затем делаешь lock на структуру, чтобы значения зафиксирвать затем рядом создаешь второй ряд по ctrl +a и смотрим изменения в реальном времени (игра должна быть в оконном режим, чтобы мы видели как цифры скачут) чтобы увидеть изменения менее 100мс нужно поставить интервал меньше По идее это должно сработать
  • Делаем EFLAGS таблицу

    Перенесена Статьи и видео шаблоны фишки ce lua
    3
    2
    0 Голоса
    3 Сообщения
    127 Просмотры
    MasterGHM
    Ответил
  • Пошаговая отладка Lua скриптов

    Перенесена Статьи и видео debug ce lua фишки
    2
    1
    0 Голоса
    2 Сообщения
    215 Просмотры
    MasterGHM
    Открываем Lua консоль из дизассемблера Пишем Lua скрипт Дальше по шагам как на картинке Если мы пишем какую-то функцию и она дает сбой, то её можно отладить как на скриншоте. Это может быть и не функция. Например, код прочитал какой-то файл с текстом сохраненных параметров и подсмотрели в пошаговой Lua отладке что происходит дальше. *Действуют горячие клавиши. Например, F7— шаг, F9 — запуск без остановки.
  • Выход из рутины до ближайшего цикла

    Перенесена Статьи и видео шаблоны ce lua фишки
    1
    1
    0 Голоса
    1 Сообщения
    75 Просмотры
    MasterGHM
    собенности переход на следующий адрес по инструкциям ветвления вычисляется Lua кодом по ret, jmp, jmp condition до исполнения кода определение опкодов ветвления по readmem без дизассемблериования по тестам последний брейкпоинт снимается на ближайшем цикле Пример лога до близжайшего цикла, когда поднимается из рутины вверх > RET :00454684 - C3 - ret > -->> :0045468C - 5B - pop ebx > RET :0045468F - C3 - ret > -->> :00454695 - C3 - ret > RET :00454695 - C3 - ret > -->> :00437F36 - 5B - pop ebx > RET :00437F37 - C3 - ret > -->> :004272EB - 5B - pop ebx > RET :004272EC - C3 - ret > -->> :004273E9 - 5E - pop esi > RET :004273EA - C3 - ret > -->> :00437A2E - 5F - pop edi > RET :00437A34 - C3 - ret > -->> :0043B749 - 5B - pop ebx > RET :0043B74D - C3 - ret > -->> :00427195 - 5F - pop edi > RET :00427198 - C3 - ret > -->> :004376BB - 8B 45 FC - mov eax,[ebp-04] > RET :004376C2 - C2 0400 - ret 0004 > -->> :0043B880 - 89 46 0C - mov [esi+0C],eax > RET :0043B88A - C3 - ret > -->> :0043BFF4 - 84 C0 - test al,al > isCJMP :0043BFF6 - 75 09 - jne 0043C001 > RET :0043C003 - C3 - ret > -->> :0044DFAD - 5E - pop esi > RET :0044DFAF - C3 - ret > -->> :00437A2E - 5F - pop edi \--[[ Версия: 0.01.b1 Выход из рутины до близжайшего цикла ]]-- mainAddress = 0x0045B5A4 -- адрес некоторого параметра в игре nextAddress = nil is64bits = targetIs64Bit() tableInstruction ={} tableBreakpointsAddress ={} function ContaintsBeakPoint(address) for i = 1, #tableBreakpointsAddress do if tableBreakpointsAddress[i] == address then return true end end return false end \-- Возвращает адрес по ret function GetNextAddressFromRET(address) if is64bits then nextAddress = readPointer(RSP) else nextAddress = readPointer(ESP) end return nextAddress end \-- Возвращает адрес по Jmp function GetNextAddressFromJMP(address) local disassembledstring = nil if is64bits then local disassembledstring = disassemble(RIP) else local disassembledstring = disassemble(EIP) end local _, opcode, _, _ = splitDisassembledString(disassembledstring) return GetAddressFromOpcode(opcode) end function ToBits(num, bits) local t = {} for b = bits, 1, -1 do rest = math.fmod(num,2) t[b] = math.floor(rest) num = (num-rest)/2 end if num == 0 then return t else return {'Not enough bits to represent this number'} end end function GetEFLAGS() local bitsTable = ToBits(EFLAGS, 16) local tableEFLAGS = { OF = bitsTable[17-12], DF = bitsTable[17-11], SF = bitsTable[17-8], ZF = bitsTable[17-7], AF = bitsTable[17-5], PF = bitsTable[17-3], CF = bitsTable[17-1] } --for k,v in pairs(tableEFLAGS) do -- print (k..' = '..v) --end -- --print(EFLAGS) --local s = '' --for i=1,#bitsTable do -- s = s..bitsTable[i] --end --print(s) return tableEFLAGS end \-- Возвращает адрес из опкода jmp dword ptr [edi*4+07895D88] или jmp 07895D88 \--print(string.format('%08X', newAddress)) function GetAddressFromOpcode (opcode) local rightLine = string.match(opcode, '%S*%s*(%S*)') local isPointer = string.match(opcode, '%[') if isPointer then rightLine = string.match(opcode, '%[(.*)%]') --00454664 - 8B 83 60030000 - mov eax,[ebx+00000360] if string.match(opcode, 'eax') then rightLine = string.gsub(rightLine, 'eax', EAX) end if string.match(opcode, 'ebx') then rightLine = string.gsub(rightLine, 'ebx', EBX) end if string.match(opcode, 'ecx') then rightLine = string.gsub(rightLine, 'ecx', ECX) end if string.match(opcode, 'edx') then rightLine = string.gsub(rightLine, 'edx', EDX) end if string.match(opcode, 'esi') then rightLine = string.gsub(rightLine, 'esi', ESI) end if string.match(opcode, 'edi') then rightLine = string.gsub(rightLine, 'edi', EDI) end if string.match(opcode, 'esp') then rightLine = string.gsub(rightLine, 'esp', ESP) end if string.match(opcode, 'ebp') then rightLine = string.gsub(rightLine, 'ebp', EBP) end if is64bits then if string.match(opcode, 'rax') then rightLine = string.gsub(rightLine, 'rax', RAX) end if string.match(opcode, 'rbx') then rightLine = string.gsub(rightLine, 'rbx', RBX) end if string.match(opcode, 'rcx') then rightLine = string.gsub(rightLine, 'rcx', RCX) end if string.match(opcode, 'rdx') then rightLine = string.gsub(rightLine, 'rdx', RDX) end if string.match(opcode, 'rsi') then rightLine = string.gsub(rightLine, 'rsi', RSI) end if string.match(opcode, 'rdi') then rightLine = string.gsub(rightLine, 'rdi', RDI) end if string.match(opcode, 'rsp') then rightLine = string.gsub(rightLine, 'rsp', RSP) end if string.match(opcode, 'rbp') then rightLine = string.gsub(rightLine, 'rbp', RBP) end if string.match(opcode, 'r8') then rightLine = string.gsub(rightLine, 'r8', R8) end if string.match(opcode, 'r9') then rightLine = string.gsub(rightLine, 'r9', R9) end if string.match(opcode, 'r10') then rightLine = string.gsub(rightLine, 'r10', R10) end if string.match(opcode, 'r11') then rightLine = string.gsub(rightLine, 'r11', R11) end if string.match(opcode, 'r12') then rightLine = string.gsub(rightLine, 'r12', R12) end if string.match(opcode, 'r13') then rightLine = string.gsub(rightLine, 'r13', R13) end if string.match(opcode, 'r14') then rightLine = string.gsub(rightLine, 'r14', R14) end if string.match(opcode, 'r15') then rightLine = string.gsub(rightLine, 'r15', R15) end end return getAddress('%['..rightLine..'%]') end return getAddress(rightLine) end \-- Возвращает адрес по Jmp condition, когда тот выполняется или не выполняется function GetNextAddressFromConditionJMP(address, size) local _,opcode,_,_ = splitDisassembledString(disassemble(address)) local leftString = string.match(opcode, '%S*') local eflags = GetEFLAGS() if (leftString == 'jnz' or leftString == 'jne') then if eflags.ZF == 0 then return GetAddressFromOpcode(opcode) end elseif (leftString == 'je' or leftString == 'jz') then if eflags.ZF == 1 then return GetAddressFromOpcode(opcode) end elseif (leftString == 'jg' or leftString == 'jnle') then if eflags.ZF == 0 and eflags.SF == eflags.OF then return GetAddressFromOpcode(opcode) end elseif (leftString == 'jb' or leftString == 'jc' or leftString == 'jnae') then if eflags.CF == 1 then return GetAddressFromOpcode(opcode) end elseif (leftString == 'jae') then if eflags.CF == 0 then return GetAddressFromOpcode(opcode) end elseif (leftString == 'ja') then if eflags.CF == 0 and eflags.ZF == 0 then return GetAddressFromOpcode(opcode) end elseif (leftString == 'jbe') then if eflags.CF == 1 and eflags.ZF == 1 then return GetAddressFromOpcode(opcode) end elseif (leftString == 'jl' or leftString == 'jnge') then if eflags.SF ~= eflags.OF then return GetAddressFromOpcode(opcode) end elseif (leftString == 'jle' or leftString == 'jng') then if eflags.ZF == 1 or eflags.SF ~= eflags.OF then return GetAddressFromOpcode(opcode) end elseif (leftString == 'jna') then if eflags.CF == 1 or eflags.ZF == 1 then return GetAddressFromOpcode(opcode) end elseif (leftString == 'jc') then if eflags.CF == 1 then return GetAddressFromOpcode(opcode) end elseif (leftString == 'jp' or leftString == 'jpe') then if eflags.PF == 1 then return GetAddressFromOpcode(opcode) end elseif (leftString == 'jnp' or leftString == 'jpo') then if eflags.PF == 0 then return GetAddressFromOpcode(opcode) end elseif (leftString == 'jnb' or leftString == 'jnc') then if eflags.CF == 0 then return GetAddressFromOpcode(opcode) end elseif (leftString == 'jnbe') then if eflags.CF == 0 and eflags.ZF == 0 then return GetAddressFromOpcode(opcode) end elseif (leftString == 'jno') then if eflags.OF == 0 then return GetAddressFromOpcode(opcode) end elseif (leftString == 'jns') then if eflags.SF == 0 then return GetAddressFromOpcode(opcode) end elseif (leftString == 'jo') then if eflags.OF == 1 then return GetAddressFromOpcode(opcode) end elseif (leftString == 'js') then if eflags.SF == 1 then return GetAddressFromOpcode(opcode) end elseif (leftString == 'jge' or leftString == 'jnl') then if eflags.CF == 1 and eflags.OF == 1 then return GetAddressFromOpcode(opcode) end elseif (leftString == 'jrcxz') then if RCX == 0 then return GetAddressFromOpcode(opcode) end elseif (leftString == 'jecxz') then if ECX == 0 then return GetAddressFromOpcode(opcode) end end return address + size end function IsRet(address) local value = readBytes(address,1, false) return value == 0xC3 or value == 0xCB or value == 0xC2 or value == 0xCA end function IsCall(address) local value = readBytes(address,1, false) return value == 0xFF or value == 0xE8 -- or value == 0x9A end function IsJMP(address) local value = readBytes (address, 1, false) if value == 0xFF then if readBytes (address + 1, 1, false) == 05 then return false end end return value == 0xEB or value == 0xE9 or value == 0xFF -- or value == 0xEA \--[[ 078921A8 - EB 38 - jmp 078921E2 0789242D - E9 E2000000 - jmp 07892514 07894F4C - FF E2 - jmp edx 07895C67 - FF 24 BD 885D8907 - jmp dword ptr [edi*4+07895D88] ]]-- end function IsConditionJMP(address) local value = readBytes (address, 1, false) return value == 0x77 or value == 0x73 or value == 0x72 or value == 0x76 or value == 0xE3 or value == 0x74 or value == 0x7F or value == 0x7D or value == 0x7C or value == 0x7E or value == 0x75 or value == 0x71 or value == 0x7B or value == 0x79 or value == 0x70 or value == 0x7A or value == 0x78 or value == 0x0F end \-- Возвращает адрес, на который, будет прыжок function GetNextAddress(addressXIP) -- Определить на какой инструкции мы находимся, чтобы узнать на какую следующу инструкцию ставить бряк -- ret - прыжок по смещению ESP/RSP -- jmp - прыжок без условия -- je, jne, jxx - прыжок с улосвием -- Определить размер инструкции, тип инструкции на текущем addressXIP local findIndex = -1 for i = 1, #tableInstruction do if tableInstruction[i].XIP == addressXIP then findIndex = i break end end local size = 0 local isRet = false local isJMP = false local isCJMP = false if findIndex == -1 then -- Если нет данных ---------------- ЗАПОМИНАТЬ РАЗМЕР ИНСТРУКЦИИ (чтобы не дизассемблировать повторно) size = getInstructionSize(addressXIP) isRet = IsRet(addressXIP) isJMP = IsJMP(addressXIP) isCJMP = IsConditionJMP(addressXIP) table.insert(tableInstruction, {XIP = addressXIP, SIZE = size, ISRET = isRet, ISJMP = isJMP, ISCJMP = isCJMP}) else -- Если данные есть size = tableInstruction[findIndex].SIZE isRet = tableInstruction[findIndex].ISRET isJMP = tableInstruction[findIndex].ISJMP isCJMP = tableInstruction[findIndex].ISCJMP end --------------- if isRet then print('> RET :' ..disassemble(nextAddress)) nextAddress = GetNextAddressFromRET(addressXIP) print('> -->> :' ..disassemble(nextAddress)) elseif isJMP then print('> isJMP :' ..disassemble(nextAddress)) nextAddress = GetNextAddressFromJMP(addressXIP) elseif isCJMP then print('> isCJMP :' ..disassemble(nextAddress)) nextAddress = GetNextAddressFromConditionJMP(addressXIP, size) else nextAddress = addressXIP + size end return nextAddress end function debugger_onBreakpoint() local isContaintsBreakPoint = false -- Удалить прошлый брейкпоинт if(nextAddress ~= nil) then isContaintsBreakPoint = ContaintsBeakPoint(nextAddress) if isContaintsBreakPoint then debug_removeBreakpoint(nextAddress) end end -- Поставить брейкпоинт на следующую инструкцию не входя в call-ы local XIP = 0 if is64bits then XIP = EIP else XIP = RIP end nextAddress = GetNextAddress(XIP) if not ContaintsBeakPoint(nextAddress) then debug_setBreakpoint(nextAddress, 1, bptExecute, bpmDebugRegister) table.insert(tableBreakpointsAddress, nextAddress) end return 1 --1 не показывать дизассемблер end if getOpenedProcessID() == 0 then openProcess('test.exe') end \--bptWrite \--bptAccess debug_removeBreakpoint() debug_setBreakpoint(mainAddress, 4, bptWrite, bpmDebugRegister) Справка 77 cb JA rel8 D Valid Valid Jump short if above (CF=0 and ZF=0). 73 cb JAE rel8 D Valid Valid Jump short if above or equal (CF=0). 72 cb JB rel8 D Valid Valid Jump short if below (CF=1). 76 cb JBE rel8 D Valid Valid Jump short if below or equal (CF=1 or ZF=1). 72 cb JC rel8 D Valid Valid Jump short if carry (CF=1). E3 cb JCXZ rel8 D N.E. Valid Jump short if CX register is 0. E3 cb JECXZ rel8 D Valid Valid Jump short if ECX register is 0. E3 cb JRCXZ rel8 D Valid N.E. Jump short if RCX register is 0. 74 cb JE rel8 D Valid Valid Jump short if equal (ZF=1). 7F cb JG rel8 D Valid Valid Jump short if greater (ZF=0 and SF=OF). 7D cb JGE rel8 D Valid Valid Jump short if greater or equal (SF=OF). 7C cb JL rel8 D Valid Valid Jump short if less (SF≠ OF). 7E cb JLE rel8 D Valid Valid Jump short if less or equal (ZF=1 or SF≠ OF). 76 cb JNA rel8 D Valid Valid Jump short if not above (CF=1 or ZF=1). 72 cb JNAE rel8 D Valid Valid Jump short if not above or equal (CF=1). 73 cb JNB rel8 D Valid Valid Jump short if not below (CF=0). 77 cb JNBE rel8 D Valid Valid Jump short if not below or equal (CF=0 andZF=0). 73 cb JNC rel8 D Valid Valid Jump short if not carry (CF=0). 75 cb JNE rel8 D Valid Valid Jump short if not equal (ZF=0). 7E cb JNG rel8 D Valid Valid Jump short if not greater (ZF=1 or SF≠ OF). 7C cb JNGE rel8 D Valid Valid Jump short if not greater or equal (SF≠ OF). 7D cb JNL rel8 D Valid Valid Jump short if not less (SF=OF). 7F cb JNLE rel8 D Valid Valid Jump short if not less or equal (ZF=0 and SF=OF). 71 cb JNO rel8 D Valid Valid Jump short if not overflow (OF=0). 7B cb JNP rel8 D Valid Valid Jump short if not parity (PF=0). 79 cb JNS rel8 D Valid Valid Jump short if not sign (SF=0). 75 cb JNZ rel8 D Valid Valid Jump short if not zero (ZF=0). 70 cb JO rel8 D Valid Valid Jump short if overflow (OF=1). 7A cb JP rel8 D Valid Valid Jump short if parity (PF=1). 7A cb JPE rel8 D Valid Valid Jump short if parity even (PF=1). 7B cb JPO rel8 D Valid Valid Jump short if parity odd (PF=0). 78 cb JS rel8 D Valid Valid Jump short if sign (SF=1). 74 cb JZ rel8 D Valid Valid Jump short if zero (ZF = 1). 0F 87 cw JA rel16 D N.S. Valid Jump near if above (CF=0 and ZF=0). Not supported in 64-bit mode. 0F 87 cd JA rel32 D Valid Valid Jump near if above (CF=0 and ZF=0). 0F 83 cw JAE rel16 D N.S. Valid Jump near if above or equal (CF=0). Not supported in 64-bit mode. 0F 83 cd JAE rel32 D Valid Valid Jump near if above or equal (CF=0). 0F 82 cw JB rel16 D N.S. Valid Jump near if below (CF=1). Not supported in 64-bit mode. 0F 82 cd JB rel32 D Valid Valid Jump near if below (CF=1). 0F 86 cw JBE rel16 D N.S. Valid Jump near if below or equal (CF=1 or ZF=1). Not supported in 64-bit mode. 0F 86 cd JBE rel32 D Valid Valid Jump near if below or equal (CF=1 or ZF=1). 0F 82 cw JC rel16 D N.S. Valid Jump near if carry (CF=1). Not supported in 64-bit mode. 0F 82 cd JC rel32 D Valid Valid Jump near if carry (CF=1). 0F 84 cw JE rel16 D N.S. Valid Jump near if equal (ZF=1). Not supported in 64-bit mode. 0F 84 cd JE rel32 D Valid Valid Jump near if equal (ZF=1). 0F 84 cw JZ rel16 D N.S. Valid Jump near if 0 (ZF=1). Not supported in 64-bit mode. 0F 84 cd JZ rel32 D Valid Valid Jump near if 0 (ZF=1). 0F 8F cw JG rel16 D N.S. Valid Jump near if greater (ZF=0 and SF=OF). Notsupported in 64-bit mode. 0F 8F cd JG rel32 D Valid Valid Jump near if greater (ZF=0 and SF=OF). 0F 8D cw JGE rel16 D N.S. Valid Jump near if greater or equal (SF=OF). Not supported in 64-bit mode. 0F 8D cd JGE rel32 D Valid Valid Jump near if greater or equal (SF=OF). 0F 8C cw JL rel16 D N.S. Valid Jump near if less (SF≠ OF). Not supported in 64-bit mode. 0F 8C cd JL rel32 D Valid Valid Jump near if less (SF≠ OF). 0F 8E cw JLE rel16 D N.S. Valid Jump near if less or equal (ZF=1 or SF≠ OF). Not supported in 64-bit mode. 0F 8E cd JLE rel32 D Valid Valid Jump near if less or equal (ZF=1 or SF≠ OF). 0F 86 cw JNA rel16 D N.S. Valid Jump near if not above (CF=1 or ZF=1). Not supported in 64-bit mode. 0F 86 cd JNA rel32 D Valid Valid Jump near if not above (CF=1 or ZF=1). 0F 82 cw JNAE rel16 D N.S. Valid Jump near if not above or equal (CF=1). Not supported in 64-bit mode. 0F 82 cd JNAE rel32 D Valid Valid Jump near if not above or equal (CF=1). 0F 83 cw JNB rel16 D N.S. Valid Jump near if not below (CF=0). Not supported in 64-bit mode. 0F 83 cd JNB rel32 D Valid Valid Jump near if not below (CF=0). 0F 87 cw JNBE rel16 D N.S. Valid Jump near if not below or equal (CF=0 and ZF=0). Not supported in 64-bit mode. 0F 87 cd JNBE rel32 D Valid Valid Jump near if not below or equal (CF=0 and ZF=0). 0F 83 cw JNC rel16 D N.S. Valid Jump near if not carry (CF=0). Not supported in 64-bit mode. 0F 83 cd JNC rel32 D Valid Valid Jump near if not carry (CF=0). 0F 85 cw JNE rel16 D N.S. Valid Jump near if not equal (ZF=0). Not supported in 64-bit mode. 0F 85 cd JNE rel32 D Valid Valid Jump near if not equal (ZF=0). 0F 8E cw JNG rel16 D N.S. Valid Jump near if not greater (ZF=1 or SF≠ OF). Not supported in 64-bit mode. 0F 8E cd JNG rel32 D Valid Valid Jump near if not greater (ZF=1 or SF≠ OF). 0F 8C cw JNGE rel16 D N.S. Valid Jump near if not greater or equal (SF≠ OF). Not supported in 64-bit mode. 0F 8C cd JNGE rel32 D Valid Valid Jump near if not greater or equal (SF≠ OF). 0F 8D cw JNL rel16 D N.S. Valid Jump near if not less (SF=OF). Not supported in 64-bit mode. 0F 8D cd JNL rel32 D Valid Valid Jump near if not less (SF=OF). 0F 8F cw JNLE rel16 D N.S. Valid Jump near if not less or equal (ZF=0 and SF=OF). Not supported in 64-bit mode. 0F 8F cd JNLE rel32 D Valid Valid Jump near if not less or equal (ZF=0 and SF=OF). 0F 81 cw JNO rel16 D N.S. Valid Jump near if not overflow (OF=0). Not supported in 64-bit mode. 0F 81 cd JNO rel32 D Valid Valid Jump near if not overflow (OF=0). 0F 8B cw JNP rel16 D N.S. Valid Jump near if not parity (PF=0). Not supported in 64-bit mode. 0F 8B cd JNP rel32 D Valid Valid Jump near if not parity (PF=0). 0F 89 cw JNS rel16 D N.S. Valid Jump near if not sign (SF=0). Not supported in 64-bit mode. 0F 89 cd JNS rel32 D Valid Valid Jump near if not sign (SF=0). 0F 85 cw JNZ rel16 D N.S. Valid Jump near if not zero (ZF=0). Not supported in 64-bit mode. 0F 85 cd JNZ rel32 D Valid Valid Jump near if not zero (ZF=0). 0F 80 cw JO rel16 D N.S. Valid Jump near if overflow (OF=1). Not supported in 64-bit mode. 0F 80 cd JO rel32 D Valid Valid Jump near if overflow (OF=1). 0F 8A cw JP rel16 D N.S. Valid Jump near if parity (PF=1). Not supported in 64-bit mode. 0F 8A cd JP rel32 D Valid Valid Jump near if parity (PF=1). 0F 8A cw JPE rel16 D N.S. Valid Jump near if parity even (PF=1). Not supported in 64-bit mode. 0F 8A cd JPE rel32 D Valid Valid Jump near if parity even (PF=1). 0F 8B cw JPO rel16 D N.S. Valid Jump near if parity odd (PF=0). Not supported in 64-bit mode. 0F 8B cd JPO rel32 D Valid Valid Jump near if parity odd (PF=0). 0F 88 cw JS rel16 D N.S. Valid Jump near if sign (SF=1). Not supported in 64-bit mode. 0F 88 cd JS rel32 D Valid Valid Jump near if sign (SF=1). 0F 84 cw JZ rel16 D N.S. Valid Jump near if 0 (ZF=1). Not supported in 64-bit mode. 0F 84 cd JZ rel32 D Valid Valid Jump near if 0 (ZF=1). Если трейсить трейслогом 1000 инструкций поверх call, то видим многократное повторение пути внутри цикла между 00437A34 и 0044DFAF. С помощью скрипта можно выйти на цикл не используя трейслог Можно использоваться функции определения куда прыгнет поток, до его выполнения. Можно оперировать таблицей адресов с брейкпоинтами в пошаговой отладке.
  • Регулярки на Lua. Пронумеровать список строк

    Перенесена Статьи и видео ce lua обучалка regular
    1
    0 Голоса
    1 Сообщения
    59 Просмотры
    MasterGHM
    Пример задачи. Пронумеровать список string string.byte string.char string.dump string.find string.format string.gmatch string.gsub string.len string.lower string.match string.pack string.packsize string.rep string.reverse string.sub string.unpack string.upper local text = [[ string string.byte string.char string.dump string.find string.format string.gmatch string.gsub string.len string.lower string.match string.pack string.packsize string.rep string.reverse string.sub string.unpack string.upper ]] function EnumerateText(text) local count = 0 local rez = text:gsub('%C+', function (s) count = count + 1 return string.format('%s. %s', count, s) end) showMessage(rez) writeToClipboard(rez) end EnumerateText(text) И получил ответ. В следующий раз только вызывать "EnumerateText([[ текст со строками]])" 1. string 2. string.byte 3. string.char 4. string.dump 5. string.find 6. string.format 7. string.gmatch 8. string.gsub 9. string.len 10. string.lower 11. string.match 12. string.pack 13. string.packsize 14. string.rep 15. string.reverse 16. string.sub 17. string.unpack 18. string.upper Тут в буфер текст улетит и выведет в мессагу. После закрытия мессаги через CTRL+V вставит текст, куда хотим Пронумерованные функции — функции работы со строками последней версии Lua 5.3.x из документации На что стоит обратить внимание при регулярках: Работа с пробелами и не пробелами: "%s" и "%S" Работа с символами разделяющие строки и не разделяющими строки: "%с" и "%С" Захват строк "(.+)", "(.-)", "(.)", а также без захвата, т.е. пропуск других символов ".+",".-","." Узнать как и какая функция из выше перечисленных работает, какая используется с регуляторами. Хотим к примеру вывести слово, которое закончится на пробеле (пишу просто "на пробеле" без учета других символов). Это уже "(%w+)", а если хотим второе слово, то это "%W+%w+" (не выводить первое и вывести второе слово) или "%s(%w+)" (после пробела, но чтобы было без пробела, то захватить в круглые скобки), или "^.+%s(%w+)"(начинать с первого символа до пробела и захват до конца слова). Если писать на CE Lua, то регулярки знать не обязательно. Но, их желательно знать, чтобы читать чужой код и писать свой. Да и вообще это интересно. Очень короткие выражения позволяют решить некоторую задачу за быстрое время. Основные задачи: поиск текста и замена текста.
  • Оптимизация splitDisassembledString()

    Перенесена Статьи и видео ce lua optimization фишки
    1
    0 Голоса
    1 Сообщения
    676 Просмотры
    MasterGHM
    Напишем функцию, которая в 3.2 раз быстрее splitDisassembledString(disassemble(address)) \-- Линия: 0045464A - FF 05 A4B54500 - inc [0045B5A4] { [000003EA] } function GetDebugString(address) return splitDisassembledString(disassemble(address)) end \-- address, bytes, opcode function GetDebugString2(address) local clearString = string.gsub(disassemble(address), '%s','') return string.match(clearString, '^(.-)%-(.-)%-(.-)$') end function NoOptimizeCode() GetDebugString(0x0045464A) end function OptimizeCode() GetDebugString2(0x0045464A) end local countRepeat = 100000 -- add more cycle local x1 = 0 local x2 = 0 x1 = getTickCount() for i = 1, countRepeat do NoOptimizeCode() end x2 = getTickCount() for i = 1, countRepeat do OptimizeCode() end print(string.format("%.2f", (x2 - x1)/(getTickCount() - x2)) ) Сравнивая скорости получаем оптимизацию в ~3.20 раза быстрее. Пример использования function GetDebugString2(address) local clearString = string.gsub(disassemble(address), '%s','') return string.match(clearString, '^(.-)%-(.-)%-(.-)$') end local address, bytes, opcode = GetDebugString2(0x0045464A) print(address) print(bytes) print(opcode) gsub очищает пробелы, а выражение '^(.-)%-(.-)%-(.-)$' позволит захватить данные между тире в строке. Может пригодится, когда трейсим своим Lua кодом. Если заинтересовали регулярки: ссылка
  • Заполненение таблицы данными по базовому адресу

    Перенесена Статьи и видео фишки ce lua ce memrec ce aa
    1
    2
    0 Голоса
    1 Сообщения
    93 Просмотры
    MasterGHM
    Нажали checkbox — заполнились данные по базовому адресу Отжали checkbox — удалились данные [ENABLE] {$lua} baseAddress = 0x40000000 function FillValues(baseAddress, userValue) stringData = [[ Голод 20 Болезнь -10 Депрессия -40 Усталость 8 Ранения -28 Скрытность 6c Изготовление 84 Исследования 54 Собирательство 3c Охота b4 Рыбалка e4 Сбор cc Готовка 9c Сила 114 Ловкость fc Телосложение 144 Борьба 12c Интелект 1a4 Речь 174 Медицина 18c Знания 15c ]] -- Захват данных включая знак for name, value in stringData:gmatch('(%S+).-(%S?%x+)') do local stringPointer = '' local indexMinus = value:find('-') if indexMinus then stringPointer = string.format('[%08X - %s]', baseAddress, value:sub(indexMinus + 1)) else stringPointer = string.format('[%08X + %s]', baseAddress, value) end -- Добавить дочерний memrec -- memrec это ссылка на memrec, в котором написан этот скрипт local newMemRect = getAddressList().createMemoryRecord() newMemRect.Description = name newMemRect.Address = stringPointer newMemRect.Type = vtDword newMemRect.appendToEntry(memrec) end end \-- Запись userValue по baseAddress FillValues(baseAddress, userValue) [DISABLE] {$lua} for i = 0, memrec.Count-1 do memrec[0].destroy() end Если проще руками забить и поставить опцию раскрытия, то можно и без скрипта.
  • Поиск по формуле

    Перенесена Статьи и видео фишки идея scan memory ce lua
    1
    7
    0 Голоса
    1 Сообщения
    79 Просмотры
    MasterGHM
    В таблице поиска есть колонки ссылающиеся на название Lua перменных: "value" и "previousvalue" Сравнивать текущее и предыдущие значения вместе или по отдельности, в том числе на разных вкладках CE Примеры: value == 65 value == 0x65 (или поставить галку hex) value ~= 65 (или поставить галку not) Можно и такое сравнение сделать после поиска неизвестного используя математические функции: math.abs(value - previousvalue) < 10 Можно делать различные комбинации: and (логическое И). or (логическое ИЛИ). not (логическое НЕ). \+ (сложение); \- (вычитание); * (умножение); / (деление); ^ (возведение в степень); % (остаток от деления). == (равно); ~= (не равно); < (меньше); > (больше); <= (меньше или равно); >= (больше или равно). Можно написать функцию xor function BitXOR(a,b)--Bitwise xor local p,c=1,0 while a>0 and b>0 do local ra,rb=a%2,b%2 if ra~=rb then c=c+p end a,b,p=(a-ra)/2,(b-rb)/2,p*2 end if a<b then a=b end while a>0 do local ra=a%2 if ra>0 then c=c+p end a,p=(a-ra)/2,p*2 end return c end А потом применяем даже отдельные функции как в этом примере "value > 0 and BitXOR(value, 100) " А может быть я хочу только 100 первых результатов function BitXOR(a,b)--Bitwise xor local p,c=1,0 while a>0 and b>0 do local ra,rb=a%2,b%2 if ra~=rb then c=c+p end a,b,p=(a-ra)/2,(b-rb)/2,p*2 end if a<b then a=b end while a>0 do local ra=a%2 if ra>0 then c=c+p end a,p=(a-ra)/2,p*2 end return c end valueCount = 0 function CheckCount100() valueCount = valueCount + 1 return valueCount <= 100 end CheckCount100() and value > 0 and BitXOR(value, 50) Также хочу добавить те адреса, которые предположительно являются указателями getAddressSafe('['..value..']')~=nil Или наоборот не являются указателями getAddressSafe('['..value..']')==nil Еще можно попробовать добавить 50 красных и 50 синих указателей в таблицу CE, но это уже задание кому интересно. Можно в теории сравнивать адреса со значениями известных адресов и даже с известными указателями, с метками. Но поиск может затянуться, если адресов очень много. Можно попробовать указать условие, что значение адреса должно находиться в X структуре или в её вероятных указателях. Или попробовать оставить только одинаковые значения адресов, т.е. повторяющихся более 1 раза. Или попробовать искать только те адреса, к которым применимы сразу несколько условий чтобы не кликать их постоянно: (изменилось) И (больше 0) И (меньше 10000) (не изменилось) И (больше 0) И (меньше 10000)
  • Медленный брейкпоинт

    Перенесена Статьи и видео breakpoint фишки идея
    1
    0 Голоса
    1 Сообщения
    660 Просмотры
    MasterGHM
    Если условный брейкпоинт очень часто выполняется и это приводит к очень сильным тормозам, то есть пара приемов Сделать АА скрипт, который проверяет условие cmp eax, [АДРЕС] jne x1 nop // здесь поставить на код брейкпоинт без условия x1: // здесь оригинальный код На инструкции проходит очень много адресов и окно с определяемыми адресами виснет. Теоретическое решение. Сделать АА скрипт, который через alloc() создаст блок памяти (буфер) для будущих адресов и их счетчиков. Через второй АА код сделать инъекцию, которая во время игры в буфер будет записывать не повторяющиеся адреса и повторяющиеся счетчики. Чтобы просмотреть результат можно зайти в MemoryView — просмотр памяти в CE. Области памяти также можно сравнивать в "Dessect Data" окне
  • ~ Cheat Engine Basics Tutorial(Step 1 - 7) ~ [En]

    Перенесена Статьи и видео tutorial
    1
    0 Голоса
    1 Сообщения
    150 Просмотры
    MasterGHM
    ~ Cheat Engine Basics Tutorial(Step 1 - 7) ~ (прохождение туториала CE) Ссылка на оригинал статьи Yo! I noticed that many people ask for help in CE tutorial. So I decided to explain it here. I will not explain only to pass it but to learn some basics. Do not use password just to pass step you can’t do, that's useless. You won't learn and gain anything... If someone will make topic “Help on 3rd step of tutorial!!” or anything like that, direct him to this one, unless mine is not explained clearly/he do not understand what I wrote. If you will see that something is not right or something is not clearly explained, PM me and I will edit it. This tutorial contains 7 steps. You can jump to anyone you want when you will enter password in 1st step window in right bottom corner. Ok, here we go: FIRST OF ALL, open Cheat Engine. If it will ask you to open tutorial, click yes. If u already clicked no, go to cheat engine folder and find it there. Once you opened tutorial, we can start... (Texts wrote in "code", with darker background are default step descriptions, below them there is mine) Step1 - Introduction Code: Welcome to the Cheat Engine Tutorial. (v2.5) This tutorial will try to explain the basics of cheating on games, and getting you more familiar with Cheat Engine. First open Cheat Engine if it hasn't been opened yet. Then click on the 'open process' icon. (top left icon, with the computer on it) When the process window is open find this tutorial. The process name is probably 'tutorial.exe' unless you renamed me. Select it, and click ok. Just ignore all the other buttons right now, but experiment with them later if you feel like it. When everything went right, the process window should be gone now and at the top of CE the processname is shown. Now, click NEXT to continue to the next step. (Or fill in the password to proceed to that particular step you want) First open Cheat Engine and Tutorial. Now, click the button with computer icon on it (It’s in top left corner). New window will pop up. Here, you can choose proccess that you want cheat with. Find Tutorial.exe proccess, click on it and click Ok button, or just double click on this proccess. If you done everything right, proccess name you chose(Tutorial.exe) should be written in top of Cheat Engine window. If it does, click next. Step 2 - Exact Value scanning (Password: 090453) Code: Now that you have opened the tutorial with Cheat Engine lets get on with the next step. You see at the bottom of this window the text Health: xxx Each time you click 'Hit me' your health gets decreased. To get to the next step you have to find this value and change it to 1000 To find the value there are different ways, but I'll tell you about the easiest, 'Exact Value': First make sure value type is set to at least 2 bytes or 4 bytes, 1 byte will also work, but you'll run into a (easy to fix) problem when you've found the address and want to change it. The 8-byte may perhaps works if the bytes after the address are 0, but I wouldn't take the bet. Single, double, and the other scans just dont work, because they store the value in a different way. When the value type is set correctly, make sure the scantype is set to 'Exact Value' Then fill in the number your health is in the value box. And click 'First Scan' After a while (if you have a extremly slow pc) the scan is done and the results are shown in the list on the left(if the number of addresses it found are less than the number below that list) If you find more than 1 address and you dont know for sure wich address it is, click 'Hit me', fill in the new health value into the value box, and click 'Next Scan' repeat this untill you're sure you've found it. (that includes that there's only 1 address in the list.....) Now double click the address in the list on the left. This makes the address pop-up in the list at the bottom, showing you the current value. Double click the value, (or select it and press enter), and change the value to 1000. If everything went ok the next button should become enabled, and you're ready for the next step. Note: If you did anything wrong while scanning, click "New Scan" and repeat the scanning again. Also, try playing arround with the value and click 'hit me' In this step you have to find health value and change it to 1000.You will learn here how use Exact Value Scanning and for what is it. Let’s say that you play some game, and with each hit we lose some HP(health). Now force enemy to hit you(click “Hit me” button below your health). As you can see, your health decreased. Now go to Cheat Engine, in Scan Type choose Exact Value, in Value Type choose 4 Bytes, type number of your health in window above Scan Type and click First Scan(If you already have scanned before, cause you were curious or you wanted to click this button, you will have New Scan instead of First Scan. Click it and then do what I just said). Below computer icon(this one in top left corner) you can see “Found:”. It shows you how many addresses with value matching to one you wrote were found. If there are too many(“too many” are when addresses are not displayed in window below “found:”, in CE v5.3 there is probably no limit for displayed addresses...), click New Scan and get hurt once again(by clicking on “Hit me” in tutorial window). Type in CE new HP value and click First Scan. Do it until some addresses will be displayed in window below “found:”. Of course there are more ways to find correct value, but this tutorial heading is “Exact Value Scanning”, so we will use only this option. Ok when you have displayed few addresses, go to tutorial (Leave CE as it is, with these addresses in the list) and click “Hit me”. Go to CE, look on found addresses list and find decreased value(previously every address was equal to number of health before this hit. So when previously your health were 96, look for value smaller than this one, but at once it have to be equal to new health number). Example: I had 96HP, and after that hit I lost 5, so now I have 91. So I have to look for 91 value, while almost every other will be 96. So our will differ from others, which makes it easy to find. Once we found it, click on it and press red arrow pointing to left/down, or just double click on it. It will show in window on bottom of CE. There you can see 5 labels: Freeze(If it’s ticked, value of address in same line will be froze/stopped, it will not be able to change), Description(as it says, you can add it by yourself), Address(shows address), Value Type(Shows type of value stored in address in same line), Value(shows value stored in address in same line). Our objective is to change HP value to 1000, so double click on value. New window will open with current amount of value. Change it to 1000 and click OK. If everything went ok, you should be able to click Next in tutorial window to go to next step. If you can’t that means that you changed value to wrong one, or you changed wrong value(you have wrong address). So if you made something wrong here’s one more time everything what above, but in shorter version: In tutorial click hit me In cheat engine write number of your health and click first scan If you got too many addresses, press new scan, then hit me and write new amount of HP. Repeat it until you will find only few addresses(about 20-30 or less). If you found enough few, go to tutorial and click hit me Go to cheat engine, look on list of addresses on left and look there for address equal to new amount of HP(it’s easy to find it cause it differ from others) If you found it, double click on it. It will move to window on bottom Now double click its value(It is in vertical line under Value label). New window will show Write here 1000 and click OK Go to tutorial and click Next Step 3 – Unknown Initial Value (Password: 419482) Code: Ok, seeing that you've figured out how to find a value using exact value let's move on to the next step. In the previous test we knew the initial value so we could do a exact value, but now we have a statusbar where we dont know the starting value. We only know that the value is between 0 and 500. And each time you click 'hit me' you lose some health. The ammount you lose each time is shown above the statusbar. Again there are several different ways to find the value. (like doing a decreased value by... scan), but I'll only explain the easiest. "Unknown initial value", and decreased value. Because you dont know the value it is right now, a exact value wont do any good, so choose as scantype 'Unknown initial value', again, the value type is 4-bytes. (most windows apps use 4-bytes) click first scan and wait till it's done. When it is done click 'hit me'. You'll lose some of your health. (the ammount you lost shows for a few seconds and then disapears, but you dont need that) Now go to Cheat Engine, and choose 'Decreased Value' and click 'Next Scan' When that scan is done, click hit me again, and repeat the above till you only find a few. We know the value is between 0 and 500, so pick the one that is most likely the address we need, and add it to the list. Now change the health to 5000, to proceed to the next step. Ok here you have to find value stored in bar and cahgne it to 5000. Same as previous, but here we do not have exact value… but bar! What could be stored in it ? One thing is sure – value from 0 to 500. It would take way too long to search for every value using exact value scan type. So here we have to look for “Unknown Initial Value”. In Scan Type choose it and click first scan. It should find a lot of addresses(it finds ALL adresses that store 4 bytes values, unless you choose other value type). So to reducethis amount a little, we have two options: Easier(for beginners) – After first scan click “Hit me” in tutorial, go to cheat engine and, chagne Scan Type to Decreased value(you know why, cause we will look for decreaed values, and one of them is our helath) and click Next Scan. It should find few addresses. Our address is 0 – 500, so look for similar one. If you found more than one, and you aren’t sure which one is it, you can click “Hit me” and check which one decreased, or click “Hit me” and scan for Decreased Value once more. Your choice. Faster(You have to remember decreased value if you want to use this one) - After first scan click “Hit me” in tutorial, go to cheat engine and, chagne Scan Type to Decreased value by… and write here amount of lost HP(if you clicked “Hit me” more times, you have to sum up every decreased amount ) and click Next Scan(example: I clicked Hit me and I lost 5hp, so I write 5). It should find only 1, at least ONLY few values. Ok now we have value stored in bar, change it to 5000(if you got to this step by yourself, I assume that you can do it). After that, click Next in tutorial window to go to 4th step. Step 4 – Floating Points (Password: 890124) Code: In the previous tutorial we used bytes to scan, but some games store information in so called 'floating point' notations. (propably to prevent simple memory scanners from finding it the easy way) a floating point is a value with some digits behind the point. (like 5.12 or 11321.1) Below you see your health and ammo. Both are stored as Floating point notations, but health is stored as a float and ammo is stored as a double. Click on hit me to lose some health, and on shoot to decrease your ammo with 0.5 You have to set BOTH values to 5000 or higher to proceed. Exact value scan will work fine here, but you may want to experiment with other types too. Hint: It is recommended to disable "Fast Scan" for type float. 
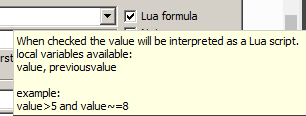
Here we have to find value for HP and ammo and change them to 5000 or higher. Do it same as previous, but instead of 4 bytes Value Type look for Float(if you scan for HP) or Double(if you scan for ammo). If you need explanation, here it is: Change Value Type to Float, Scan Type to Exact Value and look for [amount of HP]. Use exact value with floats and doubles ONLY if value you look for do not have numbers behind dot(91.56). If it has, use some other options like Value Between… and write here… you know what. If somehow you don’t know, here is example(I have 56.81321384321964 HP, so I will write in Value Between… 56 and 57, or 56.8 and 56.9 for more precise scanning). Of course you can use others if you want. Once you found HP value, double click on it to add it to bottom list(let’s call this list Cheat List). Now do the same but change scan type to Double and look for ammo(you can use Values Between too if you want). If you will find both addresses, change their values to 5000 or higher, go to tutorial and click Next. Step 5 – Code Finder (Password: 888899) Code: Sometimes the location something is stored at changes when you restart the game, or even while you're playing.. In that case you can use 2 things to still make a table that works. In this step I'll try to descibe how to use the Code Finder function. The value down here will be at a different location each time you start the tutorial, so a normal entry in the address list wouldn't work. First try to find the address. (you've got to this point so I assume you know how to) When you've found the address, right-click the address in Cheat Engine and choose "Find out what writes to this address". A window will pop up with an empty list. Then click on the Change value button in this tutorial, and go back to Cheat Engine. If evrything went right there should be an address with assembler code there now. Click it and choose the replace option to replace it with code that does nothing. That will also add the code address to the code list in the advanced options window. (Wich gets saved if you save your table) Click on stop, so the game will start running normal again, and close to close the window. Now, click on Change value, and if everything went right the Next button should become clickable. Note: When you're freezing the address with a high enough speed it may happen that next becomes visible anyhow Ok scan for value that is in tutorial. If you got this far by yourself, you have to be able to find it. Once you found correct one, add it to Cheat List. Now right click on it and choose “Find out what writes to this address”. Confirmation window will pop up, click YES. Now you can see empty window with some unclickable buttons. Ok go to tutorial and click Change Value. Return to blank window. Some strange line of letters will appear in it. Click on it once and then press Replace(button to the right). Choose any name you want, you won’t need it now and click OK. Click Stop and then Close to return to Cheat Engine main window. Ok I’m explaining what you just did: You replaced code that was responsible for changing value with nothing, so now Change Value button in tutorial window will NOT work. Want to see? Go ahead to tutorial and click Change value. See? Once you did it, Next button should be available. Click it to proceed to 6th step. Step 6 – Pointers (Password: 098712) Code: In the previous step I explained how to use the Code finder to handle changing locations. But that method alone makes it difficult to find the address to set the values you want. Thats why there are pointers: At the bottom you'll find 2 buttons. One will change the value, and the other changes the value AND the location of the value. For this step you dont really need to know assembler, but it helps a lot if you do. First find the address of the value. When you've found it use the function to find out what writes to that address. Change the value again, and a item will show in the list. Double click that item. (or select and click on more info) and a new window will open with detailed information on what happened when the instruction ran. If the assembler instruction doesnt have anything between a '[' and ']' then use another item in the list. If it does it will say what it think will be the value of the pointer you need. Go back to the main cheat engine window (you can keep this extra info window open if you want, but if you close it, remember what is between the [ and ] ) and do a 4 byte scan in hexadecimal for the value the extra info told you. When done scanning it may return 1 or a few hundred addresses. Most of the time the address you need will be the smallest one. Now click on manually add and select the pointer checkbox. The window will change and allows you to type in the address of a pointer and a offset. Fill in as address the address you just found. If the assembler instruction has a calculation (e.g: [esi+12]) at the end then type the value in thats at the end. else leave it 0. If it was a more complicated instruction look at the calculation. example of a more complicated instruction: [EAX*2+EDX+00000310] eax=4C and edx=00801234. In this case EDX would be the value the pointer has, and EAX2+00000310 the offset, so the offset you'd fill in would be 24C+00000310=3A8. (this is all in hex, use cal.exe from windows in scientific mode to calculate) Back to the tutorial, click OK and the address will be added, If all went right the address will show P->xxxxxxx, with xxxxxxx being the address of the value you found. If thats not right, you've done something wrong. Now, change the value using the pointer you added in 5000 and freeze it. Then click Change pointer, and if all went right the next button will become visible. extra: In this tutorial the value is actually pointed to by a pointer to a pointer, but to finish this tutorial only 1 pointer will be needed. To find the pointer to this pointer, just search for what changes the value of the pointer. If you know assembler, you may see something like mov eax,[ebp-4] mov eax,[eax+310] Dont be confused by this. just use the value the extra info window tells you. ebp-4 points to the stack which contained the pointer to this pointer, but the stack location does change all the time, so dont search for ebp, search for the value of eax Pointers are wonderful. They posses great power. They are very useful. Like I said, VERY useful. Pointer is like arrow/line/finger that points specific address’s value. It will point it always, even if value will change its location. Most games now uses values changing addresses, so pointers are really important. 
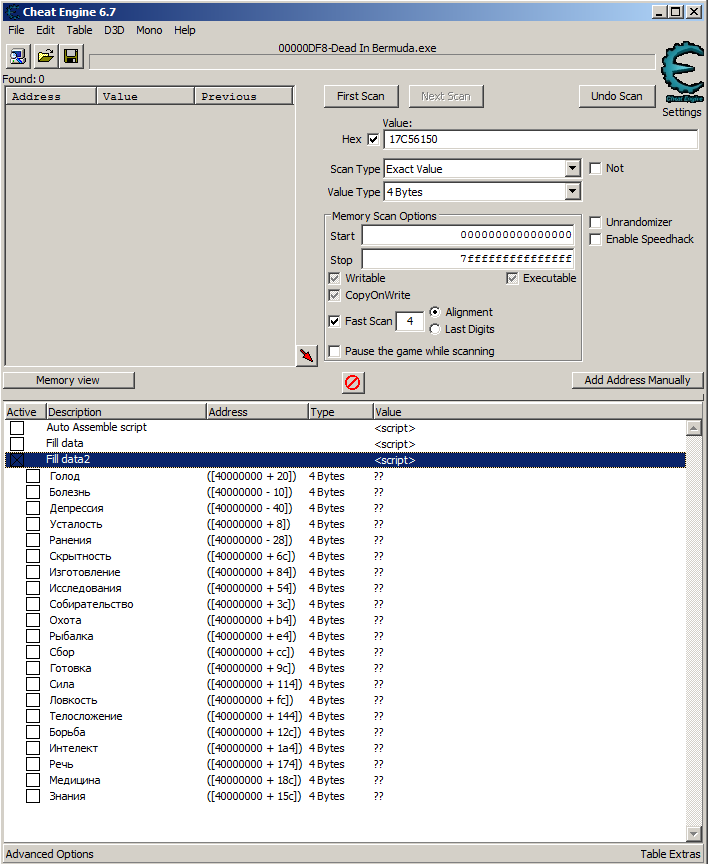
First, scan for value shown on the bottom of tutorial window. If you will find it, find out what writes to it, go to tutorial and change value. Now return to window that appeared after clicking “find out what writes to this address”. There should be some code. Click on it and select “More information” or just double click it. See code with red arrows on its left? If it points to code that’s between [ and ], look what is written under “The value of the pointer needed to find this address is probably” and Remember it. Now go to CE main window, and tick “Hex” box near window where you write value that you want to scan for. If you ticked it, in window next to this box should appear 00000000. Change it with remembered value and click First Scan. It should find one/few addresses. Now, look at left and down. You will see “Add address manually” button. Press it. New window should pop up. In it, tick “Pointer” box. After this, window should get longer. In Address of pointer write address(Address, no value! Address is this one on left, under “Address” label)which you found when you were scanning for hex value. In Offset (hex) write 0(yea, just zero). Click OK. In bottom window you should see new address, like P->xxxxxxxx, and next to it its value. If value is ??, you made something wrong. Here is shorter version for this, if you failed: Find value(this one in tutorial window) Find out what writes to it Change value and double click on just shown code in “Find out what…” window Remember what is written under ” The value of the pointer needed to find this address is probably” In Cheat engine tick “Hex” box(it’s under New Scan/First Scan) Write remembered code and scan for it If it found 1 address, remember it. If it found few, correct one is probably this one at the top. NOTE. Remember Address, no value! This is important! Click “Add address manually” button Tick “Pointer” box In Address of pointer write remembered address In Offset(Hex) leave 0 Click Ok in bottom window look on new address(it should be P->xxxxxxxx) If its value is ??, repeat step from 1-14 Go to tutorial window and click Change Pointer. Now you have 3 seconds to change our pointer(address with P->xxxxxxxx) to 5000. Don’t worry if you missed. Just once more click Change Pointer and once more try to change it in time. If you will, click Next. Step 7 - Code Injection: (Password: 013370) Code: Code injection is a technique where one injects a piece of code into the target process, and then reroute the execution of code to go through your own written code In this tutorial you'll have a health value and a button that will decrease your health with 1 each time you click it. Your task is to use code injection to increase the value of your health with 2 every time it is clicked Start with finding the address and then find what writes to it. then when you've found the code that decreases it browse to that address in the disassembler, and open the auto assembler window (ctrl+a) There click on template and then code injection, and give it the address that decreases health (If it isn't already filled in correctly) That'll generate a basic auto assembler injection framework you can use for your code. Notice the alloc, that'll allocate a block of memory for your code cave, in the past, in the pre windows 2000 systems, people had to find code caves in the memory(regiosn of memory unusaed by the game), but thats luckely a thing f the past since windows 2000, and will these days cause errors when trying to be used, due to SP2 of XP and the NX bit of new CPU's Also notice the line newmem: and originalcode: and the text "Place your code here" As you guessed it, write your code here that will increase the health with 2. a usefull assembnler instruction in this case is the "ADD instruction" here are a few examples: "ADD [00901234],9" to increase the address at 00901234 with 9 "ADD [ESP+4],9" to increase the address pointed to by ESP+4 with 9 In this case, you'll have to use the same thing between the brackets as the original code has that decreases your health Notice: It is recommended to delete the line that decreases your health from the original code section, else you'll have to increase your health with 3 (you increase with 3, the original code decreases with 1, so the end result is increase with 2), which might become confusing. But it's all up to you and your programming. Notice 2: In some games the original code can exist out of multiple instructions, and sometimes, not always, it might happen that a code at another place jumps into your jump instruction end will then cause unknown behaviour. If that happens, you should usually look near that instruction and see the jumps and fix it, or perhaps even choose to use a different address to do the code injection from. As long as you're able to figure out the address to change from inside your injected code. Ok now you are in 7th step, you can’t call yourself n00b anymore(If you got here by yourself). So, code injection, as it says, is when you inject code/piece of code into the process. Like in this tutorial, we have HP and it decrease by 1 every time you click “Hit me”. We have to inject our code to change Hit me button operation. It has to increase(yea, increase, never heard about Hit me increasing health…) HP by 2 every time we will click it. So let’s do it. Find that value and find out what writes to that address. Then decrease HP(by clicking Hit me). In “find out what…” window some code will appear. It’s responsible for HP decrement by 1. Click it and then press “Show Disassembler”. Big window with 3 sub windows will appear. At the top of upper left window you will see code that decrease HP by 1. Click it to see its comment(Comment is shown between top and bottom window, in this narrow bar). It should be “Decrement by 1”. Ok that was unnecessary. Now go to tools -> Auto Assemble, or just click Ctrl + A. White window will pop up, in which click Template -> Code Injection. Write here address of health decrement(It should be already filled in with correct code. To ensure, write there address with “Decrement by 1” comment). Some assembler strings will appear. It’s <basic auto assembler injection framework you can use for your code>. Whatever it is, I call it template. Now, you see “// Place your code here” under “newmem”(every phrase in assembler started with “//” is comment and they are not entertain when compiling/writing code). According to tutorial, you have to write your code there, but there are 3 options(I have no idea what assembler rules are or whatever, so I have no idea if there is any difference between these options. If someone know and there IS difference, PM me and i will eventally change it). Important!: Remember, that “Your code” is this one wrote in Memory Viewer after second dash in line where is your address(this address with “Decrement by 1” comment). We call it "your code" but realy it's just code that we want to cheat/change/inject into it code. By the way: I gathered some info about few assembler instructions by myself, for now I haven’t asked anyone if it’s true, but I will write it here: - “inc” instruction increases address’s value by 1(I can’t set it to increase more, I don’t even know if it’s possible) - “dec” instruction decreases address’s value by 1(See: what is above in brackets) - “add” instruction adds to address’s value, value that is after the code, after coma. Ok back to tutorial. 3 options: (Remember that [aaa+xxxxxxxx] is our code, I hope you know what our code is, if you do not, once more read starting with “Important!”) Like it’s in tutorial, write your code(with “[aaa+xxxxxxxx]” format) in place of “// Place your code here” comment, and at the beginning of this code place “add“(with space between “add” and code). Now, after this code, write “,3”(“coma three”, no spaces. In total it should look like this: “add [aaa+xxxxxxxx],3 ). Do you know why 3(we want to increase value by 2, not 3!)? Because few lines under newmem there is orginalcode, which decrease this value by 1. Our code increase by 3, so in total(decrease by 1 and increase by 3) these codes increase value by 2. If you don't want that orginalcode to decrease our value(so we could write 2 after code under newmem, not 3), delete "orginalcode:" and "label(orgianlcode)"(this label is in third line from top). Now, change value after your code(under newmem) from 3 to 2, because there is no orginalcode now, which was decreasing our value by 1. I hope you understand. I made some mistake in third option, i will edit it in minute... Now if you done one of written options, click “Write Code” button at the bottom of Auto Assemble window. If it shows some error, unfortunately you have to repeat. If it shows confirmation window, click OK. Now every time you will click Hit me in tutorial window, your HP should increase by 2. If they does, that’s mean that you made everything correct and Next button will be clickable. Click it to go to last step in Cheat Engine 5.3. If they doesn't... well... reapeating it would be boring and useless, so i created 3 ready codes for every option: Version according to tutorial: Code: alloc(newmem,2048) label(returnhere) label(originalcode) label(exit) 00455D7F: jmp newmem nop returnhere: newmem: add [ebx+0000030c],3 originalcode: dec [ebx+0000030c] exit: jmp returnhere Version without orginalcode: Code: alloc(newmem,2048) label(returnhere) label(exit) 00455D7F: jmp newmem nop returnhere: newmem: add [ebx+0000030c],2 exit: jmp returnhere Version with no use of newmem, just changing orginal code: Code: alloc(newmem,2048) label(returnhere) label(originalcode) label(exit) 00455D7F: jmp newmem nop returnhere: newmem: originalcode: add [ebx+0000030c],2 exit: jmp returnhere For me every option worked, if you will have some error or something in any option, tell me.
  • Сканирование памяти через AA [En]

    Перенесена Статьи и видео scan memory tutorial
    1
    0 Голоса
    1 Сообщения
    59 Просмотры
    MasterGHM
    Tutorials: Custom Scan: Multiply by 8 Оригинал статьи This tutorial will try to give an example of the usage of the custom scan: For some reason people still want to do this, so here's a custom scan script that will multiply the value you give by 8, and show the result divided by 8 Address list still shows it in the normal undivided way though How to use: Select value type custom, click new, fill in the below script, click ok, give it a name, and scan for the value you want Code: [enable] {do not change the allocnames of the following code, you are free to add new allocs though of course then don't forget to dealloc them at [disable] as well} alloc(checkroutine,2048) alloc(prologue,2048) alloc(epilogue,2048) alloc(fastscanstepsize,4) alloc(variablesize,4) alloc(firstscan,4) alloc(scantext,4) //will get the pointer to the given string alloc(scanvalue,8) //will get the value of the input string converted to an 8-byte value alloc(singlescanvalue,4) //will get the float type of the input alloc(doublescanvalue,8) //will get the double type of the input alloc(inttostr,1024) variablesize: dd 4 //defines how many bytes get saved for each found result fastscanstepsize: dd 1 //defines the stepsize when using fastscan (1=no difference) firstscan: dd 0 //set to 1 if you want the old value to be that of the first scan /* routines: Hint: You can write these routines in any language you like and export them as dll's. Then use loadlibraty and call exportfunction to use them*/ checkroutine: /* edx=pointer to new value ecx=pointer to old value */ mov eax,[edx] //eax gets the new value cmp eax,[scanvalue] //compare eax with the users input setz al //sets al to 1 if match, 0 if false (upper bits of eax are ignored) ret prologue: shl [scanvalue],3 //You can put some code here that gets executed BEFORE the scan starts ret epilogue: //You can put some code here that gets executed AFTER the scan finishes ret scandisplayroutinetype: /* displayroutinetype is a 'special' globally registered symbol (No need to alloc) The byte at this address specifies how the values are shown 0=1 byte notation 1=2 byte notation 2=4 byte notation 3=8 byte notation 4=float notation 5=double notation 6=array of bytes 7=string ascii 8=string unicode ff=use 'scandisplayroutine:' to convert the data to a string */ db ff //2=4 byte notation label(inttostr_loop) label(inttostr_reverseresult) alloc(tempinttostrbuf,50) inttostr: //input: //eax=value //edi=storage space for string push ecx push edx push edi push esi mov esi,tempinttostrbuf mov ecx,#10 inttostr_loop: xor edx,edx div ecx add dl,'0' mov [esi],dl inc esi cmp eax,0 jne inttostr_loop //now reverse the result dec esi inttostr_reverseresult: mov al,[esi] mov byte [edi],al inc edi dec esi cmp esi,tempinttostrbuf //back at base ? jae inttostr_reverseresult mov byte [edi],0 pop esi pop edi pop edx pop ecx ret scandisplayroutine: /* displayroutine is a 'special' globally registered symbol (No need to alloc) if 'scandisplayroutinetype:' is set to 255 then this routine will be called to convert the value at the address specified to a ascii-string eax=pointer to bytes at the address edx=pointer to destination string (max 50 chars) note: scandisplayroutine is only 16KB big */ push eax push edi mov eax,[eax] shr eax,3 mov edi,edx call inttostr pop edi pop eax ret [disable] dealloc(checkroutine) dealloc(prologue,2048) dealloc(epilogue,2048) dealloc(fastscanstepsize) dealloc(variablesize) dealloc(scantext) dealloc(scanvalue) dealloc(singlescanvalue) dealloc(doublescanvalue) dealloc(inttostr) dealloc(tempinttostrbuf)
  • Cheat Engine 7.5

    Софт
    1
    0 Голоса
    1 Сообщения
    140 Просмотры
    MasterGHM
    Программа Cheat Engine 7.5 --- Назначение: для создания читов (поиска и изменения игровых значений в памяти и др.) для обучения программированию. Ссылка на сайт для скачивания. Ссылка на официально руководство (только для опытных) Для тех, кто только начал обучаться программированию с помощью Cheat Engine рекомендуется читать темы на этом форуме или искать простые примеры и руководства. Также можно задать вопросы по Cheat Engine здесь на форуме
  • Рубрика "Lua код сегодня" №1

    Перенесена Статьи и видео ce lua readmemory обучалка
    1
    1
    0 Голоса
    1 Сообщения
    80 Просмотры
    MasterGHM
    Каждый день мы выкладываем в рубрику, какой-нибудь небольшой Lua код и разбираем его. Lua код №1 local address = 0x015035C8 local int_value = readInteger(address) print ("Результат: "..int_value) > Результат: 98 В этом примере происходит чтение значения из некоторого адреса и его значение выводится в консоль. Для чего это нужно? Например, для того чтобы прочитать количество здоровья персонажа. Как протестировать? Открываем Cheat Engine Открываем туториал Находим адрес В Lua консоли вводим наш код и получаем резульат
  • Новинка. BB коды

    Новости
    1
    0 Голоса
    1 Сообщения
    66 Просмотры
    MasterGHM
    Туториал по bb кодам. Т.е. по тому как форматировать сообщения Markdown Reference Создание таблиц (поискать в интернете) Tables Are Cool col 1 is left-aligned $1600 col 2 is centered $12 col 3 is right-aligned $1 Не хватает спойлеров, видео тегов, опросов. Точнее надо будет мне искать и ставить их как плагины
  • Yтилита определения кодов клавиатуры.

    Софт
    1
    0 Голоса
    1 Сообщения
    63 Просмотры
    PitronicP
    Нашёл в интернете полезную утилиту, которая может пригодится для определения кода клавиш клавиатуры если надо в lua прописать для назначения горячих клавиш через lua или эмуляцию нажатий вот скриншот Тута скачать можно на этом сайте Тута если ссылка когда ни будь будет не рабочая То можно тута Утилита бесплатная и не требует установки.
  • Новинка. Использование тегов

    Новости
    1
    0 Голоса
    1 Сообщения
    77 Просмотры
    MasterGHM
    На форуме есть возможность привязывать теги к темам. У тегов есть счетчики. По счетчикам можно определить, какие теги больше интересны.
  • Логические операторы

    Перенесена Статьи и видео ce lua логика обучалка
    1
    0 Голоса
    1 Сообщения
    683 Просмотры
    MasterGHM
    Существует три логических оператора: and, or, not. Те, кто уже знаком с языками программирования знают, как эти логические операторы работают. Например, A = true B = true if A and B then print('Условие "A and B" выполняется') end if A or B then print('Условие "A or B" выполняется') end B = false if not (B == A) then print('Условие "not (B == A)" выполняется') end Но, дальше интереснее. Все логические операторы считают false и nil ложными, а все остальное — истинными. Оператор "and" возвращает свой первый аргумент, если он ложен и в противном случае возвращается второй аргумент Оператор "or" возвращает свой первый аргумент, если он не равен false и в противном случае возвращается второй аргумент. Сходу можно запутаться, но с примерами станет понятнее print (4 and 5) --> "5". В этом примере '4" не ложный, а значит при операторе "and" вернется второй аргумент "5". print(0 and 13) --> "0". Аналогично print(false and 13) --> "false". В этом примере первый аргумент false(ложный), а значит при операторе and вернется "false". print(4 or 5) --> "4" В этом примере "4" не ложный, а значит при операторе "or" вернется уже первый аргумент "4". print(false or 5) --> "5" В этом примере "false" ложный, а значит при операторе "or" вернется уже первый аргумент "5". Если кто вспомнил, то в C# есть такой оператор "?" (условный) string result = 4 == 4 ? "равно" : "не равно"; // result будет равен true На Lua это эквивалентно local result = ( (4 == 5 and "равно") or "не равно") А если опустить все скобки, то local result = 4 < 5 and "равно" or "не равно". Скобки можно опустить, потому что "and" имеет выше приоритет чем "or." Или вот еще пример compactmenuitem.Caption = state and 'Compact View Mode' or 'Full View Mode' Вот такая интересная штука для ускоренного сравнения вместо конструкции if условие then -- код else -- код end Идем дальше. Полезной идиомой Lua является x = x or v что эквивалентно if not х then х = v end Т. е. x равен значению v, когда x ложное. Оператор "not" всегда возвращает true или false print(not nil) --> true print(not false) --> true print(not 0) --> false print(not not nil) --> false
  • Управление состояниями memory record

    Перенесена Статьи и видео ce aa ce memrec фишки
    1
    0 Голоса
    1 Сообщения
    97 Просмотры
    MasterGHM
    Перехватываем состояния у checkbox memory recrod (у записи в таблицы CE) и меняем состояние активации и деактивации по другим условиям {$lua} \-- прсто инфо memrec.OnActivate = function(record, before, currentstate) print("OnActivate"..(before and "Before " or "After ")..(currentstate and "true" or "false")) return true end \-- прсто инфо memrec.OnDeactivate = function(record, before, currentstate) print("OnDeactivate"..(before and "Before " or "After ")..(currentstate and "true" or "false")) return true end \-- подмена состояния function onMemRecPostExecute(memoryrecord, newState, succeeded) if memoryrecord == memrec and newState then print('Меня активировали, но я деактивируюсь сам') memrec.Active = false end end {$asm} [ENABLE] {$lua} print('Состояния сейчас '..(memrec.Active and "true" or "false")) print('Пишу в адрес [адрес..] ... (float)10000.0') {$asm} // написать свой адрес //[адрес..]: // dd (float)10000.0 // написать свой адрес //[адрес..]: // dd (float)10000.0 // написать свой адрес //[адрес..]: // dd (float)10000.0 [DISABLE]